Android Logcat Capture Techniques Tutorial: Easy Grasp for Non-Developers!
- Today, I want to share some tips on how to easily capture Android logs!
During the development process, there are often questions like: “Is there a quick way to capture logs?”
“How can testers or other non-developers easily capture Android logs?”
Don’t worry! I’ve compiled some simple and easy-to-understand methods to help you develop and test more efficiently.
- To capture Android logs, you can use the logcat tool. However, note that logcat only captures internal system logs.
- Capture the entire log: Use the command
adb logcatto capture the entire log.
You can specify filter conditions to capture only specific logs.
For detailed filtering methods, refer to Log Filtering Reference - Check the size of each buffer: Use the command
adb logcat -gto check the size of each buffer. - View logs in different buffers: Besides the main buffer, there are other buffers you can view,
such as radio, events, system, etc.
You can use[adb] logcat [-b 'buffer name']to view specific logs.
Here,<buffer_name>is the name of the buffer you want to view.
For example:
Main buffer log:
adb logcat -b main
Events buffer log:
adb logcat -b events
And so on. - For differences between buffers, refer to the official documentation: View Alternative Log Buffers
- Capture the entire log: Use the command
Requires su permissions
1. Extract Kernel panic log: adb pull /sys/fs/pstore/console-ramoops
2. Print Kernel log: adb shell cat /proc/kmsg (captures the current log; calling the same command a second time will display logs starting from the end of the previous capture)
3. Linux kernel-ring buffer log: adb shell su dmesg
dmesg Command Reference
No permissions required
1. Extract ANR log: adb pull /data/anr
- Using
adb logcatcan also capture logs from the currently connected device, such as:adb logcat
- This approach involves developers writing the log capture functionality within the app so that non-developers can capture logs.
-
Start a process to execute the command: For example:
Runtime.getRuntime().exec("logcat -b radio") -
Before Android 4.1,
developers could add the “READ_LOGS” permission in Manifest.xml,
and with this permission, they could obtain logs that required su permissions.However, after Android 4.1,
Google classified the “READ_LOGS” permission as one of the top ten harmful permissions,
so it is no longer recommended. You can refer to related Google developer videos.
Google Developer Related Video -
Therefore, for Android > 4.1, the permission to capture logs within the app was changed to
“signature|privileged”, which means it requires asystem signatureor the app must be placed in the privileged folder../priv-appduring the build (Privileged Permission Whitelist) to obtain theREAD_LOGSpermission. -
If using a PC to issue commands:
adb shell "pm grant <package name> android.permission.READ_LOGS && am force-stop <package name>"This can enable the
READ_LOGSpermission and force-stop the app (since the app needs to be restarted for the changes to take effect). To disable the permission, changegranttorevoke.
-
-
Developers can write code in the Android app to log to the corresponding folder
and then use adb pull to retrieve it. -
For example: after the app is written, use adb pull to retrieve it
adb pull /sdcard/Android/data/your.package.name/files/
- Use a pre-written shell script to capture logs in the background directly from the command line.
- Here is a simple example:
1. If developers need to customize it, they should fully understand the code above.
2. If non-developers are using it, they can copy the code above into a txt or blank file.
First, ensure that adb is available in the computer environment.
Modify packageName to the specified app package name.
Configure adbPath to your adb system path.
(If you are providing it for non-developers, you can also configure ./adb in the same folder path so that those without adb installed can execute it by downloading the one with adb included.)
4. (optional) You can customize the output log file name and include timestamps for differentiation, etc.
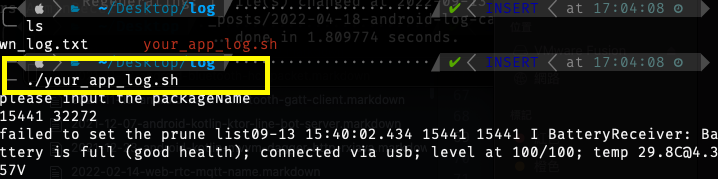
- Finally, you can execute ./your_add_log.sh in the command line (mac terminal / win cmd)
to start capturing logs!