Learn to Add Animations to the Splash Screen with Jetpack Compose!
The goal of this article is to create a
simple splash screen.
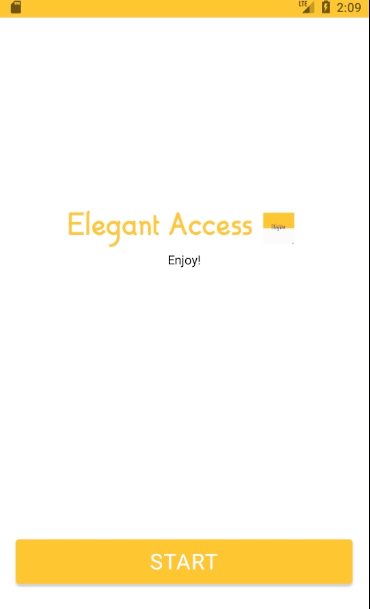
Our final goal for today will look like this:
Nowadays, many applications design an entry screen
to clearly identify the current application or company logo,
ensuring that users know which application they are using.
In this article,
we will focus on how to implement a simple transition function,
along with a simple horizontal expansion animation,
to achieve today’s goal.
If you are not yet familiar with the basics of Jetpack Compose,
you can refer to this article to deepen your understanding:
First,
we need to consider the overall structure of this page.
It is usually a habit to first imagine the final look of the screen,
so I use a Box component to conceptually separate different layers.
In this step, we will pass a function type parameter event:()->Unit = {}
so that we can trigger an external call to perform an action later.
At the same time,
we can also preset the entry and exit times of the animation,
as well as the delay time before executing the passed action.
These parameters can be adjusted according to needs,
but for ease of understanding, we will write them inside the function first.
Depending on the specific situation,
I want my logo to be in the center of the page and slightly above,
so I added a Column component and used Modifier to adjust the position.
You can refer to lines #23~#34 in the code below to adjust the position.
現在我們將進入動畫的關鍵部分,
使用了 Jetpack Compose 的 AnimatedVisibility。
這個類提供了許多內建的方法,
讓我們能夠快速實現一些基本的動畫效果。
在這一部分,
我們先來看一下前面我們定義的一個 val 變數 state。
這是 Jetpack Compose 中經常使用的概念之一,
因為在單獨使用 Composable 寫程式碼時,
它不會自動在 XML 中進行更新。
val state = remember {

    MutableTransitionState(false).apply {
        ...
    }
}
所以這邊用到 remember 來記住(儲存) MutableTransitionState 物件
這邊重點講一下 MutableTransitionState
它是一種包含了兩種狀態的 可觀察其狀態的項目
其中包含 currentState 與 targetState
根據官方解釋
當可觀察的state狀態改變時
會觸發系統讓compose去重組
所以我們可以利用這個特性
去實時變更我們compose元件的內容
例如我這邊的例子是:
1.先宣告一個staus 初始狀態為 false
2.在使用AnimatedVisibility設定該visibleState為我剛剛宣告的staus
3.回到剛剛宣吿val staus的地方加入apply
其中概念是
利用了kotlin extension 概念apply去執行scope內的code
因apply可以取得父類內的特性
所以設定MutableTransitionState內的targetState變為ture
所以使用該staus的會觸發上方說過的特性
讓我們開發時有依據去判斷何時要改變compose
val state = remember {

        MutableTransitionState(false).apply {
            // Start the animation immediately.
            targetState = true

            ...

        }
    }
也就是說,
使用上面方法觸發動畫
觸發後同時觸發Handler去執行跳轉的動作:
val state = remember {
        MutableTransitionState(false).apply {
            // Start the animation immediately.
            targetState = true

            Handler(Looper.getMainLooper()).postDelayed({
                event.invoke()
            }, delayMillis)

        }
    }
接下來,
我們將開始進行動畫的製作。
在這裡,
我們同樣使用了 Jetpack Compose 的庫,
具體來說是使用了 AnimatedVisibility。
在這個函式中,我們使用了以下幾個變數:
1.visibleState:這是控制動畫顯示狀態的變數。
透過前面提到的 remember 和 MutableTransitionState,
我們能夠觸發這個庫的動畫效果。
換句話說,當該狀態改變時,這個函式就會再次執行。
2.enter:這個變數用於定義動畫進場的效果。
3.exit:這個變數用於定義動畫退場的效果。
透過設定這些變數,
我們能夠控制動畫的出現與消失,
從而營造出令人驚艷的視覺效果。
理解上面後,就可以用官方提供的幾種內建動畫套入
進場使用 expandHorizontally
出場使用 fadeOut
也就是說在 enter與exit分別帶入要的動畫如下:
AnimatedVisibility(
          visibleState = state,
          enter = expandHorizontally(
              animationSpec = tween(
                  durationMillis = startDurationMillis,
                  easing = LinearEasing
              ),
          ),
          exit = fadeOut(
              animationSpec = tween(
                  durationMillis = exitDurationMillis,
                  easing = LinearEasing
              ),
          )
      ){
        ...
      }
接著,
在 AnimatedVisibilityScope 的函式型別範圍內,
你可以加入你想要顯示的元件,
這樣就能呈現出動畫效果了。