Compose Multiplatform 實戰:CMP中跨平台Android、iOS程式碼的進入點
Compose Multiplatform (簡稱CMP)
昨天我們大致瞭解了一下CMP的專案結構
我們從昨天的CMP的專案結構理解與編譯配置
中的專案結構可以知道
CMP專案可以在
commonMain下寫共用邏輯
androidMain 下寫Android平台的邏輯
iosMain 下寫iOS平台的邏輯
desktopMain 下寫Desktop平台的邏輯
YourProjectName
├── composeApp
│   ├── ...
│   ├── src
│   │   ├── commonMain
│   │   ├── commonTest
│   │   ├── iosMain
│   │   └── desktopMain
│   └── ...
├── ...
├── ...
└── ...
接下來我們可以開始一步一步來理解
CMP的程式碼進入點
因為涉及跨平台實作
所以總覺得需要好好理解下
程式碼是怎麼運作以及怎麼進到各自平台的
所以今天將詳細解說下CMP在跨平台的程式進入點
目錄
- Compose Multiplatform 實戰:放輕鬆點,初探CMP
- Compose Multiplatform 實戰:初戰,安裝CMP環境吧
- Compose Multiplatform 實戰:續戰,用Wizard創建CMP專案
- Compose Multiplatform 實戰:在Android、iOS模擬器上跑CMP專案
- Compose Multiplatform 實戰:CMP的專案結構理解與編譯配置
- Compose Multiplatform 實戰:CMP中跨平台Android、iOS程式碼的進入點
- Compose Multiplatform 實戰:在CMP的Compose中用Material Design3 Theme
- Compose Multiplatform 實戰:CMP用Compose實作跨平台畫面
- Compose Multiplatform 實戰:使用 expect 和 actual 實現跨平台程式碼
- Compose Multiplatform 實戰:CMP中實作Compose Navigation頁面切換
- Compose Multiplatform 實戰:CMP中透過StateFlow來管理UI狀態
- Compose Multiplatform 實戰:CMP中實作NavigationBar底部欄
- Compose Multiplatform 實戰:CMP中使用koin來依賴注入Dependency Injection
- Compose Multiplatform 實戰:CMP實作跨平台資料庫SqlDelight
- Compose Multiplatform 實戰:CMP中使用ROOM開發跨平台資料庫 & 疑難雜症
我們先簡單了解一下 Compose Multiplatform 跟 Kotlin Multiplatform
-
當然在CMP創建好的時候就已經幫你建立好這些進入點
這邊僅需理解概念即可 -
在CMP的commonMain下共用的程式碼進入點
預期在androidMain、iOSMain..等跨平台程式碼
都會去呼叫這個共用函示
來達到共用程式碼的目的 -
這裡建立了一個共用的App()函式
其中包含了
1.自定義的通用UI Theme
2.使用了koin 注入viewmodel
3.自定義Compose UI的進入點
(這個後面章節會解釋如何自定義UI Theme、使用koin、自定義Compose UI…等主題)
// in ../commonMain/App.kt
@Composable
@Preview
fun App() {

    ElegantAccessComposeTheme {
        val viewModel = koinViewModel<MainViewModel>()
        ElegantAccessApp(viewModel)
    }

}
Android實際呼叫commonMain中共用的App()函式
// in ../androidMain/App.kt
class MainActivity : ComponentActivity() {
    override fun onCreate(savedInstanceState: Bundle?) {
        super.onCreate(savedInstanceState)
        val androidModule = module {
            single<Activity> { this@MainActivity }
            single<Context> { this@MainActivity.applicationContext }
        }

        startKoin {
            modules(appModule() + androidModule)
        }

        setContent {
            // 呼叫剛剛實作共用的App()函式
            App()
        }
    }
}
- 其中Android的
Android Manifest.xml中會宣告這個MainActivity的<activity>tag
以及開啟App的初始頁面<intent-filter>
<?xml version="1.0" encoding="utf-8"?>
  <manifest xmlns:android="http://schemas.android.com/apk/res/android">
      <application
          ...>
          <activity
              ...
              android:name=".MainActivity">
              <intent-filter>
                  <action android:name="android.intent.action.MAIN" />
                  <category android:name="android.intent.category.LAUNCHER" />
              </intent-filter>
          </activity>
      </application>
  </manifest>
iosMain實際呼叫commonMain中共用的App()函式
// in ../commonIos/MainViewController.kt

fun MainViewController() = ComposeUIViewController {

    val uiViewController = LocalUIViewController.current
    val iosModule = module {
        single<UIViewControllerWrapper> { UIViewControllerWrapperImpl(uiViewController) }
    }

    KoinApplication(application = {
        modules(appModule() + iosModule)
    }) {
        App()
    }
}
- 實際在
iOS會去呼叫上面MainViewController.kt內的函式MainViewController()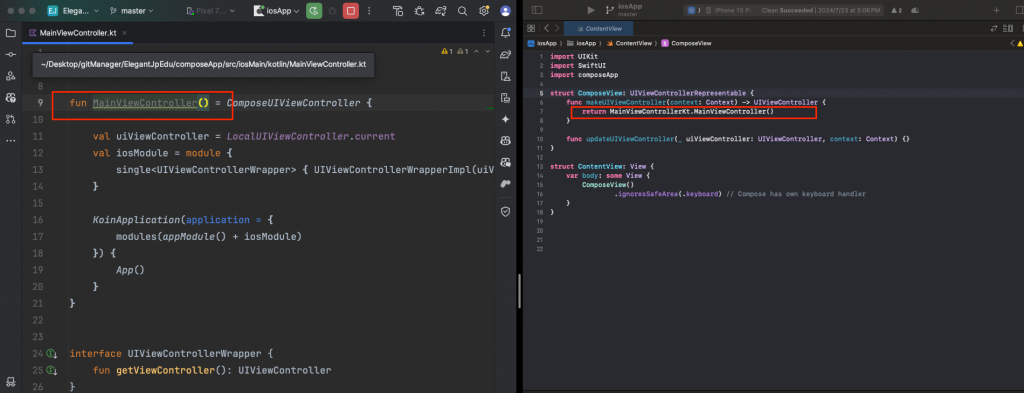
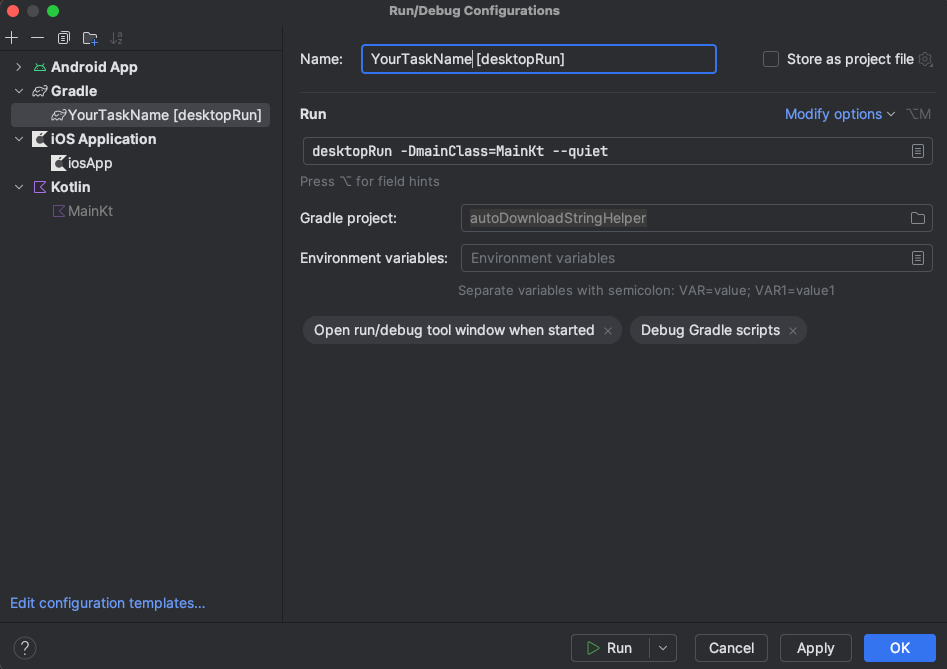
desktopMain中實際呼叫commonMain中共用的App()函式
其中透過compose裡面的application 函式搭配Window來完成desktop application// in ../desktopMain/main.kt fun main() = application { Window( onCloseRequest = ::exitApplication, title = "App", ) { App() } }- CMP中的desktop也是透過JVM去編譯
如果你要把他Build出來
則在環境中使用下方gradle cmd 即可
./gradlew desktopRun -DmainClass=MainKt --quiet - 或者可以透過IDE直接把這個Gradle task加入到Run Configuration內
-
理解完上方進入點後
我們可以開始開發共用邏輯
來達到只用一份Code製作多個平台的應用程式 -
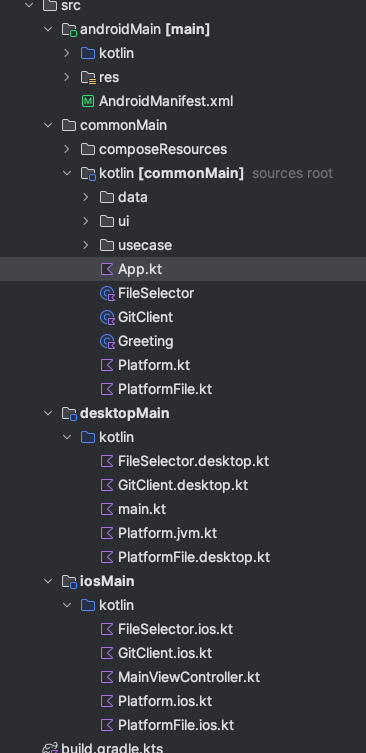
由下方圖片可看到
我們大部分的時間會花在./commonMain上
主要的邏輯開發都在此
除了有些依賴各自平台的內容,例如:檔案系統、檔案選擇器…等等
才會透過expect跟autual來實作
(後面章節會也會再講怎麼用expect跟autual)
- 不過到目前為止
即便是desktop平台或iOS平台有自己的檔案系統
導致在commonMain共用邏輯中需要自己實作
但在KMM或CMP中
都已經有支援透過kotlin程式碼
來寫這些跨平台內容的Library了
你只需要在Gradle中配置即可
例如:透過Kotlin來實作desktop的檔案相關操作:
// ../desktop/PlatformFile.desktop.kt
actual class PlatformFile actual constructor(private val path: String) {
    private val file = java.io.File(path)

    actual fun exists() = file.exists()
    actual fun createFile() = file.createNewFile()
    actual fun writeBytes(bytes: ByteArray) = file.writeBytes(bytes)
    actual fun delete() = file.delete()
    actual fun isDirectory(): Boolean = file.isDirectory
    actual fun copyTo(destination: PlatformFile, overwrite: Boolean) {
        file.copyTo(java.io.File(destination.path), overwrite)
    }
    actual fun mkdirs() {
        file.mkdirs()
    }
}

actual class PlatformZip actual constructor() {
    actual fun unzip(zipFilePath: String, destinationDir: String) {
        java.util.zip.ZipFile(zipFilePath).use { zip ->
            zip.entries().asSequence().forEach { entry ->
                val file = java.io.File(destinationDir, entry.name)
                if (entry.isDirectory) {
                    file.mkdirs()
                } else {
                    file.parentFile.mkdirs()
                    zip.getInputStream(entry).use { input ->
                        file.outputStream().use { output ->
                            input.copyTo(output)
                        }
                    }
                }
            }
        }
    }
}