Compose Multiplatform in Action: Entry Points for Cross-Platform Android and iOS Code in CMP
Compose Multiplatform (CMP)
Yesterday we gained a general understanding of the CMP project structure
From yesterday’s Understanding CMP Project Structure and Build Configuration
we learned that in a CMP project we can write
Common logic in commonMain
Android platform logic in androidMain
iOS platform logic in iosMain
Desktop platform logic in desktopMain
YourProjectName
├── composeApp
│   ├── ...
│   ├── src
│   │   ├── commonMain
│   │   ├── commonTest
│   │   ├── iosMain
│   │   └── desktopMain
│   └── ...
├── ...
├── ...
└── ...
Now let’s start understanding
the entry points of CMP code
Since it involves cross-platform implementation
I feel it’s important to understand
how the code works and how it enters each platform
so today I'll explain in detail the entry points for cross-platform code in CMP
目錄
- Compose Multiplatform 實戰:放輕鬆點,初探CMP
- Compose Multiplatform 實戰:初戰,安裝CMP環境吧
- Compose Multiplatform 實戰:續戰,用Wizard創建CMP專案
- Compose Multiplatform 實戰:在Android、iOS模擬器上跑CMP專案
- Compose Multiplatform 實戰:CMP的專案結構理解與編譯配置
- Compose Multiplatform 實戰:CMP中跨平台Android、iOS程式碼的進入點
- Compose Multiplatform 實戰:在CMP的Compose中用Material Design3 Theme
- Compose Multiplatform 實戰:CMP用Compose實作跨平台畫面
- Compose Multiplatform 實戰:使用 expect 和 actual 實現跨平台程式碼
- Compose Multiplatform 實戰:CMP中實作Compose Navigation頁面切換
- Compose Multiplatform 實戰:CMP中透過StateFlow來管理UI狀態
- Compose Multiplatform 實戰:CMP中實作NavigationBar底部欄
- Compose Multiplatform 實戰:CMP中使用koin來依賴注入Dependency Injection
- Compose Multiplatform 實戰:CMP實作跨平台資料庫SqlDelight
- Compose Multiplatform 實戰:CMP中使用ROOM開發跨平台資料庫 & 疑難雜症
Let’s first get a basic understanding of Compose Multiplatform and Kotlin Multiplatform
-
When CMP is created, these entry points are already established for you
You only need tounderstand the concepthere -
The entry point for shared code in CMP’s commonMain
isexpectedto be called by cross-platform code
in androidMain, iOSMain, etc.
to achieve the goal of sharing code -
Here we’ve created a shared App() function
which includes- A
custom common UI Theme - Using Koin for viewmodel injection
- A custom Compose UI entry point
(In later chapters, we’ll explain how to customize UI Theme, use Koin, customize Compose UI, and other topics)
- A
// in ../commonMain/App.kt
@Composable
@Preview
fun App() {

    ElegantAccessComposeTheme {
        val viewModel = koinViewModel<MainViewModel>()
        ElegantAccessApp(viewModel)
    }

}
Androidactually calls the shared App() function from commonMain
// in ../androidMain/App.kt
class MainActivity : ComponentActivity() {
    override fun onCreate(savedInstanceState: Bundle?) {
        super.onCreate(savedInstanceState)
        val androidModule = module {
            single<Activity> { this@MainActivity }
            single<Context> { this@MainActivity.applicationContext }
        }

        startKoin {
            modules(appModule() + androidModule)
        }

        setContent {
            // Call the shared App() function we implemented
            App()
        }
    }
}
- In Android’s
Android Manifest.xml, thisMainActivityis declared with an<activity>tag
along with the initial page for launching the app via<intent-filter>
<?xml version="1.0" encoding="utf-8"?>
  <manifest xmlns:android="http://schemas.android.com/apk/res/android">
      <application
          ...>
          <activity
              ...
              android:name=".MainActivity">
              <intent-filter>
                  <action android:name="android.intent.action.MAIN" />
                  <category android:name="android.intent.category.LAUNCHER" />
              </intent-filter>
          </activity>
      </application>
  </manifest>
iosMainactually calls the shared App() function from commonMain
// in ../commonIos/MainViewController.kt

fun MainViewController() = ComposeUIViewController {

    val uiViewController = LocalUIViewController.current
    val iosModule = module {
        single<UIViewControllerWrapper> { UIViewControllerWrapperImpl(uiViewController) }
    }

    KoinApplication(application = {
        modules(appModule() + iosModule)
    }) {
        App()
    }
}
- In
iOS, the functionMainViewController()from the aboveMainViewController.ktis actually called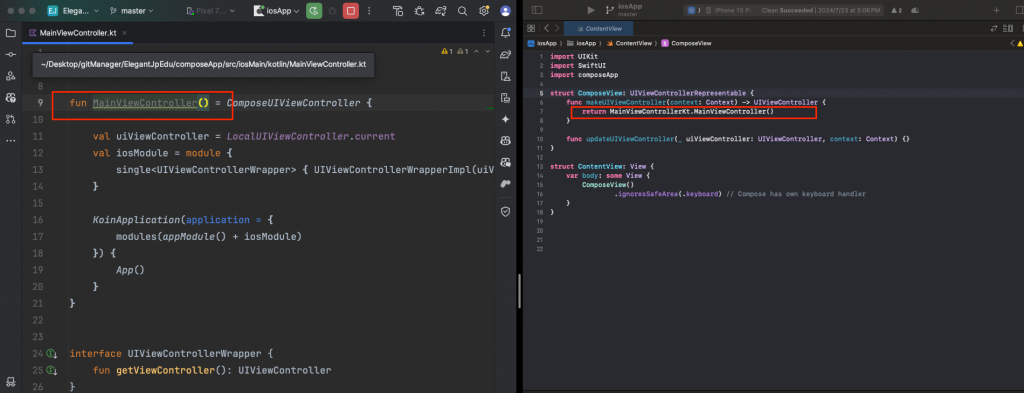
- In
desktopMain, the shared App() function from commonMain is actually called
using theapplication functionalong withWindowfrom compose to create a desktop application// in ../desktopMain/main.kt fun main() = application { Window( onCloseRequest = ::exitApplication, title = "App", ) { App() } } - The desktop component in CMP is also compiled through JVM
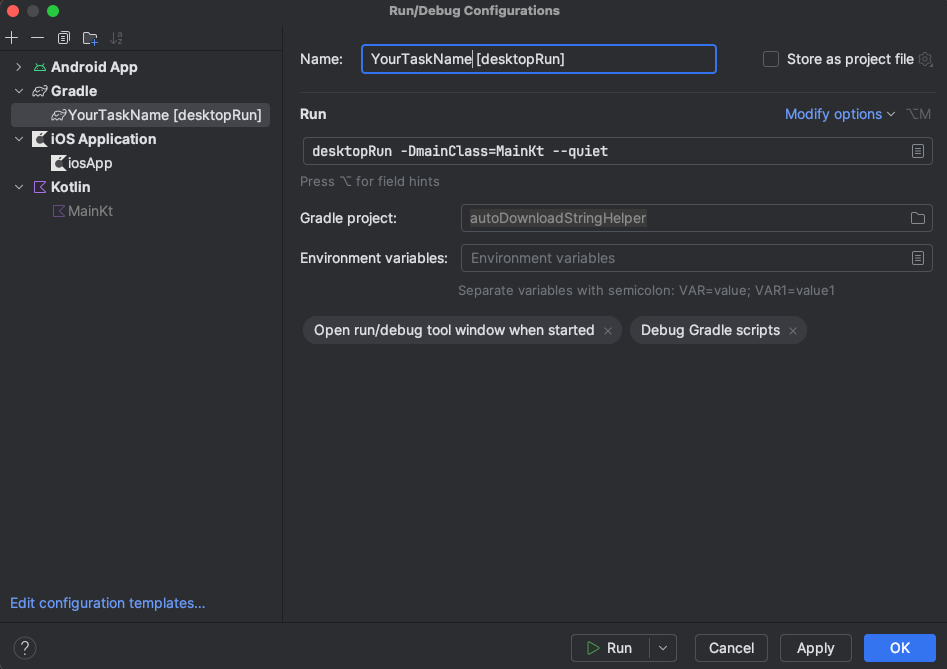
If you want to build it
use the following gradle command in your environment
./gradlew desktopRun -DmainClass=MainKt --quiet - Alternatively, you can add this Gradle task directly to the Run Configuration in your IDE
-
After understanding the entry points above
we can start developing shared logic
to achieve creating applications for multiple platforms withjust one set of code -
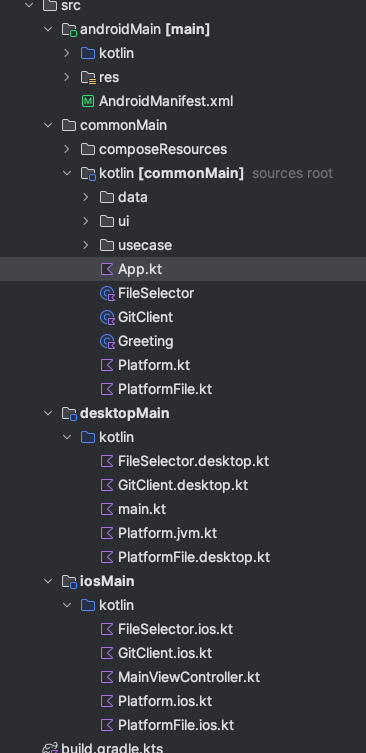
As shown in the image below
we will spend most of our time in./commonMain
most of the logic development happens here
except for things that depend on specific platforms, such as file systems, file pickers, etc.
which will be implemented throughexpectandactual
(we’ll also cover how to use expect and actual in later chapters)
- However, up to this point
even thoughdesktop platformsoriOS platformshave their own file systems
requiring custom implementations in the commonMain shared logic
in bothKMMandCMP
there are already libraries that support writing these cross-platform components
usingkotlincode
you just need toconfigure them in Gradle
For example: implementing file-related operations for desktop through Kotlin:
// ../desktop/PlatformFile.desktop.kt
actual class PlatformFile actual constructor(private val path: String) {
    private val file = java.io.File(path)

    actual fun exists() = file.exists()
    actual fun createFile() = file.createNewFile()
    actual fun writeBytes(bytes: ByteArray) = file.writeBytes(bytes)
    actual fun delete() = file.delete()
    actual fun isDirectory(): Boolean = file.isDirectory
    actual fun copyTo(destination: PlatformFile, overwrite: Boolean) {
        file.copyTo(java.io.File(destination.path), overwrite)
    }
    actual fun mkdirs() {
        file.mkdirs()
    }
}

actual class PlatformZip actual constructor() {
    actual fun unzip(zipFilePath: String, destinationDir: String) {
        java.util.zip.ZipFile(zipFilePath).use { zip ->
            zip.entries().asSequence().forEach { entry ->
                val file = java.io.File(destinationDir, entry.name)
                if (entry.isDirectory) {
                    file.mkdirs()
                } else {
                    file.parentFile.mkdirs()
                    zip.getInputStream(entry).use { input ->
                        file.outputStream().use { output ->
                            input.copyTo(output)
                        }
                    }
                }
            }
        }
    }
}