Compose Multiplatform in Action: Implementing Compose Navigation for Page Transitions in CMP
Compose Multiplatform (CMP)
Today we’re going to implement page navigation functionality in CMP
In the early days, when single-page apps weren’t as common
developers would continuously create new Activities to display new pages
However, since Activities would keep adding to the stack
performance issues had to be considered.
As time progressed the traditional layout era introduced Navigation-graph which simplified the management of page navigation
Now, Compose has also introduced a similar concept
called Compose Navigation
And of course, this concept can be applied to CMP as well
so today we’ll implement it together
目錄
- Compose Multiplatform 實戰:放輕鬆點,初探CMP
- Compose Multiplatform 實戰:初戰,安裝CMP環境吧
- Compose Multiplatform 實戰:續戰,用Wizard創建CMP專案
- Compose Multiplatform 實戰:在Android、iOS模擬器上跑CMP專案
- Compose Multiplatform 實戰:CMP的專案結構理解與編譯配置
- Compose Multiplatform 實戰:CMP中跨平台Android、iOS程式碼的進入點
- Compose Multiplatform 實戰:在CMP的Compose中用Material Design3 Theme
- Compose Multiplatform 實戰:CMP用Compose實作跨平台畫面
- Compose Multiplatform 實戰:使用 expect 和 actual 實現跨平台程式碼
- Compose Multiplatform 實戰:CMP中實作Compose Navigation頁面切換
- Compose Multiplatform 實戰:CMP中透過StateFlow來管理UI狀態
- Compose Multiplatform 實戰:CMP中實作NavigationBar底部欄
- Compose Multiplatform 實戰:CMP中使用koin來依賴注入Dependency Injection
- Compose Multiplatform 實戰:CMP實作跨平台資料庫SqlDelight
- Compose Multiplatform 實戰:CMP中使用ROOM開發跨平台資料庫 & 疑難雜症
- As demonstrated below,
sync gradleafter completion ```toml [versions] navigation-compose = “2.7.0-alpha07”
[libraries] navigation-compose = { module = “org.jetbrains.androidx.navigation:navigation-compose”, version.ref = “navigation-compose” }
<div class="c-border-content-title-1">Import the Library into build.gradle.kts</div>

* Again, since this is shared, add the following to `commonMain`:

```kotlin
    sourceSets {
        commonMain.dependencies {

            implementation(libs.navigation.compose)

        }
    }
- Remember our code entry point
App()from before? This time we’ll create a function calledElegantAccessApp()(you can name it whatever you like) and place it in there
@Composable
@Preview
fun App() {
    ElegantAccessComposeTheme {
        ElegantAccessApp()
    }
}


@Composable
fun ElegantAccessApp(
    navController: NavHostController = rememberNavController(),
) {
   // .. TODO Compose Navigation
}
- Implementing
ElegantAccessApp()
@Composable
fun ElegantAccessApp(
    navController: NavHostController = rememberNavController(),
) {

    navController.addOnDestinationChangedListener { _, destination, _ ->
        println("Navigation: Navigated to ${destination.route}")
    }

    Scaffold { paddingValues ->
        NavHost(
            navController = navController,
            startDestination = ElegantJapaneseScreen.Learning.name,
            modifier = Modifier
                .padding(paddingValues)
                .safeDrawingPadding()
                .fillMaxSize()
        ) {
            routeLearningScreen(navController)
            routeAdScreen(navController)
            routeAScreen(navController)
            routeBScreen(navController)
            routeCScreen(navController)
            routeSettingScreen(navController)
        }

    }
}
Key code explanation:
-
Parameter
navController: NavHostController:Receives aNavHostControllerIf none is provided, it creates a default one I’ve left this flexible so that in the future if we want to pass anavControllerfrom an outer layer we can do so through this method If you don’t want to write it this way you can also directly create an instance within the function -
navController.addOnDestinationChangedListener:When Navigation screen transitions occur this listens, so when you’re first getting familiar you can addlogstatements here to print the current path -
Scaffold:Is a layout structure that provides the basic visual layout structure of Material Design3 such as commonly usedtopbar,bottomBar, etc. it allows you to input your own implemented Compose components if you want to expand later, you can start from here See the figure below for more details: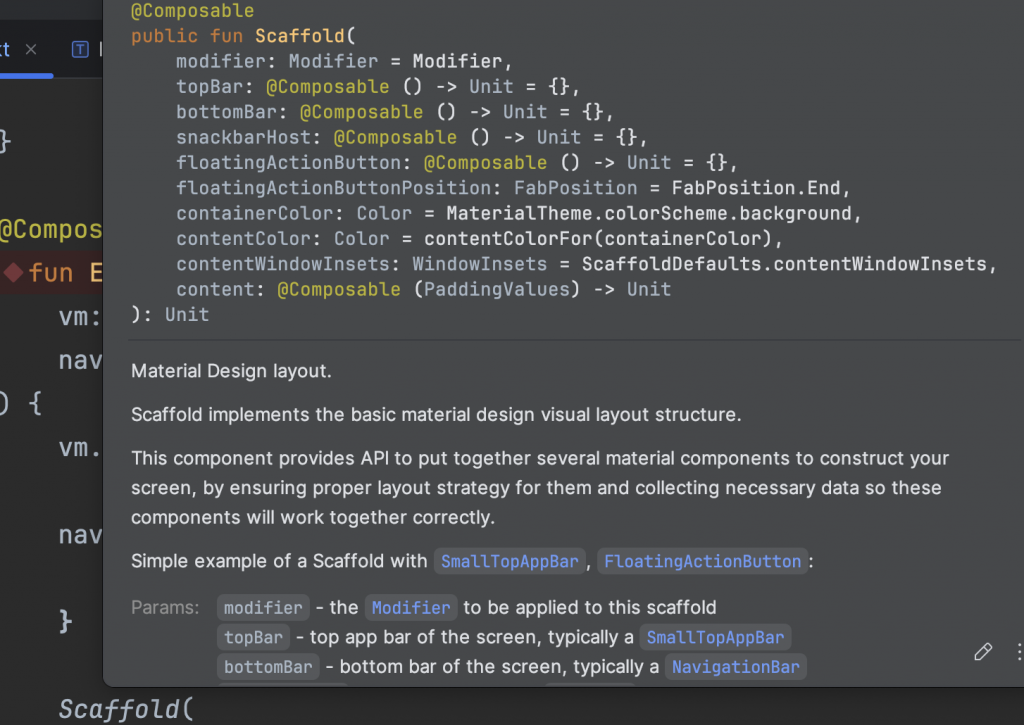
The screens you actually want to navigate to are placed in the function types inside Scaffold(){ //Here }
The paddingValues here
will return appropriate values if you’ve set up other components
like a topbar
letting you avoid content overlap
navControlleris the instance we’ll use later for navigationNavHost( navController = navController, startDestination = ElegantJapaneseScreen.Learning.name, modifier = Modifier .padding(paddingValues) .safeDrawingPadding() .fillMaxSize() ) { // ... Router }Here we input thenavControllerfrom earlier to bind it to your NavHoststartDestinationis theStringof the screen you want to start with you can define this yourselfmodifier: Takes thepaddingValuesfrom earlier to prevent screen overlap and the function type in NavHost implements the destinations of the screens you want to navigate to
- Implementing Target Screen Routers
Since we need to define the name of each screen
I’m using an enum here
to represent each screen
enum class ElegantJapaneseScreen {
    Main,
    Learning,
    Contest,
    Grammar,
    About,
    Setting,
    Ad,
}
Then you can implement several functions like this
for example: routeAScreen, routeBScreen, routeCScreen, etc.
In NavHost
you can use composable(ElegantJapaneseScreen.Contest.name)
to define specific Composable functions
This uses the Kotlin extension concept
to extend NavGraphBuilder
allowing us to intuitively place it within the NavHost function type
fun NavGraphBuilder.routeAScreen(
    navController: NavHostController,
) {
    composable(ElegantJapaneseScreen.Contest.name) {
        AScreen(navController)
    }
}
Then you just need to place it in NavHost to use it
NavHost(
    navController = navController,
    startDestination = ElegantJapaneseScreen.Learning.name,
    modifier = Modifier
        .padding(paddingValues)
        .safeDrawingPadding()
        .fillMaxSize()
) {
    routeLearningScreen(navController)
    routeAdScreen(navController)
    routeAScreen(navController)
    routeBScreen(navController)
    routeCScreen(navController)
    routeSettingScreen(navController)
}
Finally
remember the navController we started with?
You can see we’re using the same navController throughout
so when you’ve completed all the steps above
you just need to use the navController
to navigate to pages defined in NavHost
like:
navController.navigate(ElegantJapaneseScreen.XXXYourTargetRoute.name) {
    navController.graph.startDestinationRoute?.let {
        popUpTo(it) {
            saveState = true
        }
    }
    launchSingleTop = true
    restoreState = true
}
Key explanation:
navController.navigate: This is the main method to specify the target name for navigationsaveState = true: This option indicates that the state is preserved when returning to the previous page, so it can be restored in the future.launchSingleTop = true: This option indicates that if the target page is already at the top of the Stack, a new instance won’t be created, but the existing instance will be reused. This is useful for avoiding duplicate instantiation of the target page.restoreState = true: This option indicates that when navigating, if the target route previously existed and was saved, its state is restored. This helps maintain the state of the target route unchanged when navigating back to it.- All of these can be adjusted according to your own needs
You can also go back to the previous page using navigateUp
navController.navigateUp()